Minimal example application
GITHUB PROJECT: https://github.com/Pi4J/pi4j-example-minimal
In the “pi4j-example-minimal” GitHub project you can find a project which contains the minimal code to control a digital input and output with Pi4J. The project is further described on this page. The application will toggle an LED on/off and each time you press the button, the toggling speed increases. When you have pushed the button 5 times, the application stops.
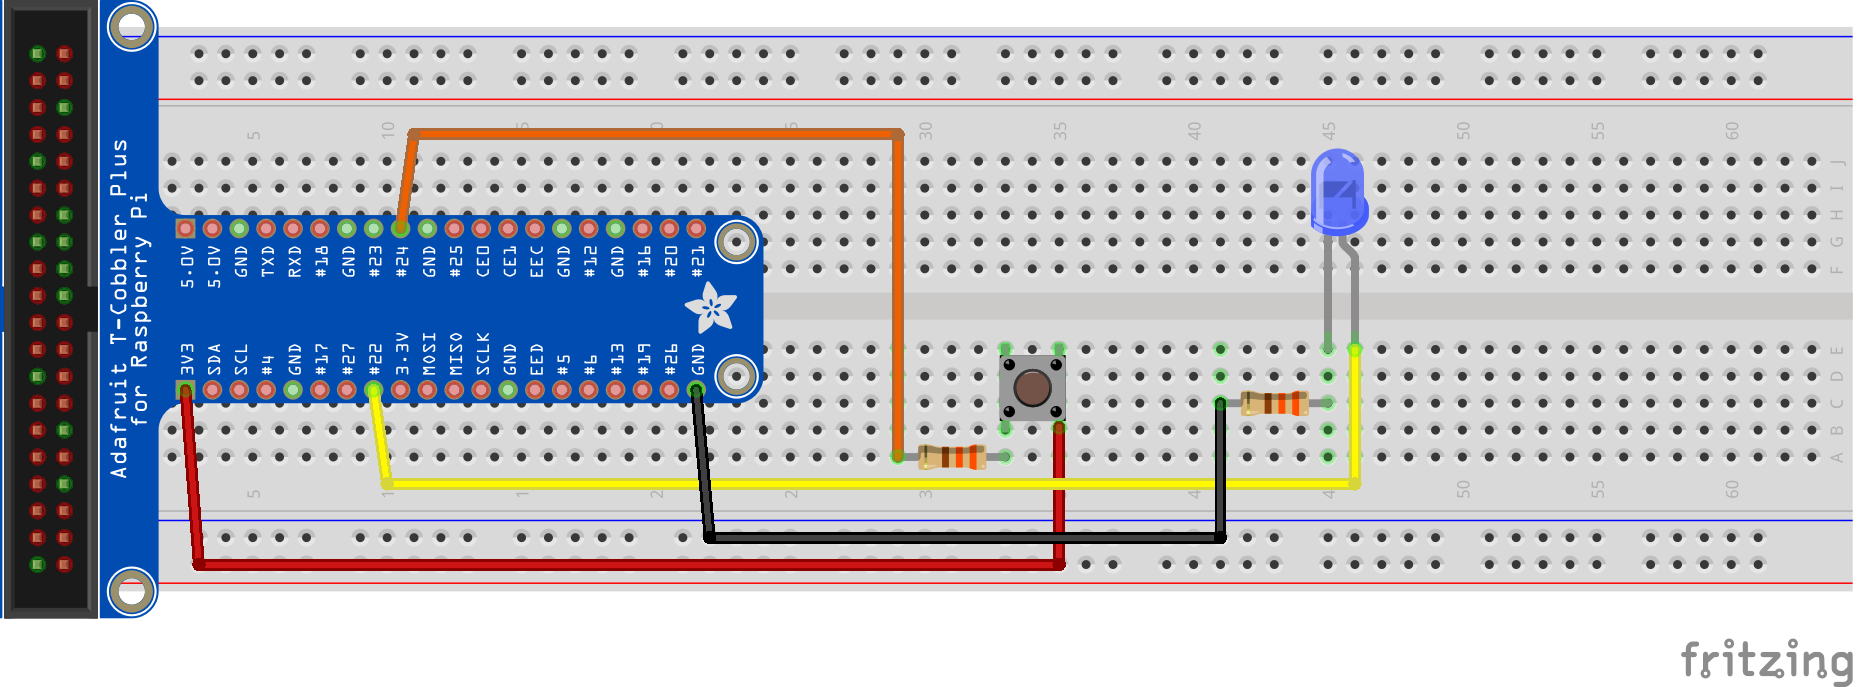
Wiring
This minimal example application uses this wiring:
Building the Application
The main build tool used by the Pi4J project is Maven, but for this example we provided both the Maven and Gradle approach, so you can select the tool you prefer.
Maven
This project can be built with Apache Maven 3.6 (or later) and Java 17 OpenJDK (or later). These prerequisites must be installed prior to building this project as described on the previous pages. The following command can be used to download all project dependencies and compile the Java module. You can build this project directly on a Raspberry Pi with Java 17+.
On Linux:
./mvnw clean package
On Windows:
mvnw.bat clean package
Gradle
You can also use the Gradle Build Tool from these same sources. Use version 6.6 (or later) and Java 17 OpenJDK (or later). The Gradle wrapper is used as described on docs.gradle.org. The Gradle configuration file build.gradle-file is included in the sources.
On Linux:
./gradlew build
On Windows:
gradlew.bat build
Dependency in pom.xml
For the Maven approach, a pom.xml file defines all the dependencies, and the build process.
In this project we will be using slf4 for logging, pi4j-core and the pi4j-plugins for the Raspberry Pi and PiGPIO. To make the versions easy to update, we add those numbers as properties.
<properties>
    <!-- DEPENDENCIES VERSIONS -->
    <slf4j.version>2.0.17</slf4j.version>
    <pi4j.version>4.0.0</pi4j.version>
</properties>
These are the dependencies we need:
<dependencies>
    <!-- Logging -->
    <dependency>
        <groupId>org.slf4j</groupId>
        <artifactId>slf4j-api</artifactId>
        <version>${slf4j.version}</version>
    </dependency>
    <dependency>
        <groupId>org.slf4j</groupId>
        <artifactId>slf4j-simple</artifactId>
        <version>${slf4j.version}</version>
    </dependency>

    <!-- Include Pi4J Core -->
    <dependency>
        <groupId>com.pi4j</groupId>
        <artifactId>pi4j-core</artifactId>
        <version>${pi4j.version}</version>
    </dependency>

    <!-- Include Pi4J Plugin (Platforms and I/O Providers) -->
    <dependency>
        <groupId>com.pi4j</groupId>
        <artifactId>pi4j-plugin-ffm</artifactId>
        <version>${pi4j.version}</version>
    </dependency>
</dependencies>
Pi4J Code Blocks
Initialization
Before you can use Pi4J you must initialize a new runtime context.
The Pi4J static class includes a few helper context creators for the most common use cases. The newAutoContext()
method will automatically load all available Pi4J extensions found in the application’s classpath which may include
Platforms and I/O Providers.
var pi4j = Pi4J.newAutoContext();
Output Pi4J Context Information
The library contains helper functions to output info about the available and used platforms and providers. To keep the
example code clean, these are part of the PrintInfo.java class. For example to print the loaded platforms:
Platforms platforms = pi4j.platforms();

console.box("Pi4J PLATFORMS");
console.println();
platforms.describe().print(System.out);
console.println();
Blink a LED
To initialize a LED, we use the minimal required code, only defining the pin number. The created led-object can be used to toggle its state.
private static final int PIN_LED = 22; // PIN 15 = BCM 22

var led = pi4j.digitalOutput().create(PIN_LED);

while (pressCount < 5) {
    if (led.state() == DigitalState.HIGH) {
        led.low();
    } else {
        led.high();
    }
    Thread.sleep(500 / (pressCount + 1));
}
Handle the Button Presses
To handle digital input events, some more configuration is needed, and we use a config builder. With that configuration, Pi4J can create the object for us and the state changes can be handled.
Additional info on the newConfigBuilder can be found on “Building an I/O Instance”.
private static int pressCount = 0;
private static final int PIN_BUTTON = 24; // PIN 18 = BCM 24

var buttonConfig = DigitalInput.newConfigBuilder(pi4j)
        .id("button")
        .name("Press button")
        .address(PIN_BUTTON)
        .pull(PullResistance.PULL_DOWN)
        .debounce(3000L);

var button = pi4j.create(buttonConfig);

button.addListener(e -> {
       if (e.state() == DigitalState.LOW) {
              pressCount++;
              console.println("Button was pressed for the " + pressCount + "th time");
       }
});
Closing the Application
Before the application quits, we need to call the shutdown() function on the Pi4J static helper class. This will ensure
that all I/O instances are properly shutdown, released by the system and shutdown in the appropriate manner. Termination
will also ensure that any background threads/processes are cleanly shutdown and any used memory is returned to the system.
pi4j.shutdown();
Steps to Run on Your Raspberry Pi
- Attach a LED and button as shown in the image above
- Use a recent Raspbian OS image which has Java 17 or newer. To check if you have the correct Java version in the terminal:
$ java -version
openjdk version "25" 2025-09-16 LTS
OpenJDK Runtime Environment Zulu25.28+85-CA (build 25+36-LTS)
OpenJDK 64-Bit Server VM Zulu25.28+85-CA (build 25+36-LTS, mixed mode, sharing)
- Download the project from GitHub and build it:
$ git clone https://github.com/Pi4J/pi4j-example-minimal.git
$ cd pi4j-example-minimal/
$ ./mvnw clean package
- Change to the distribution directory where you can find the generated package and required Java-modules.
$ cd target/distribution
$ ls -l
total 644
-rw-r--r-- 1 pi pi 344544 Oct 21 08:07 pi4j-core-4.0.0.jar
-rw-r--r-- 1 pi pi   7134 Oct 21 08:08 pi4j-example-minimal-0.0.1.jar
-rw-r--r-- 1 pi pi  22633 Oct 21 08:07 pi4j-plugin-ffm-4.0.0.jar
-rwxr-xr-x 1 pi pi    101 Oct 21 08:08 run.sh
-rw-r--r-- 1 pi pi  69435 Oct 21 08:07 slf4j-api-2.0.17.jar
-rw-r--r-- 1 pi pi  15704 Oct 21 08:07 slf4j-simple-2.0.17.jar
- Start the application with the provided
run.shscript:
$ ./run.sh
- The output will first show you some info about the platforms and providers. Then the LED starts blinking and shows how many times you pushed the button:
LED high
LED low
LED high
Button was pressed for the 1th time
LED low
LED high
Button was pressed for the 2th time
LED low
LED high
LED low
LED high
Button was pressed for the 3th time
LED low
LED high
LED low
LED high
Button was pressed for the 4th time
LED low
LED high
LED low
LED high
Button was pressed for the 5th time