FXGl to Picade
GITHUB PROJECT: https://github.com/Pi4J/pi4j-example-fxgl
In this section we demonstrate how to convert existing FXGL projects to work on a RaspberryPi
If you don’t have an existing FXGL project, go grab one from FXGLGames
Steps to get your app running on a RaspberryPi
- Add Maven support to your project In our project we use Maven to manage dependencies and build the application, other build tools such as gradle are also viable but not covered in this tutorial.
In the Project tool window, right-click your project and select Add Framework Support
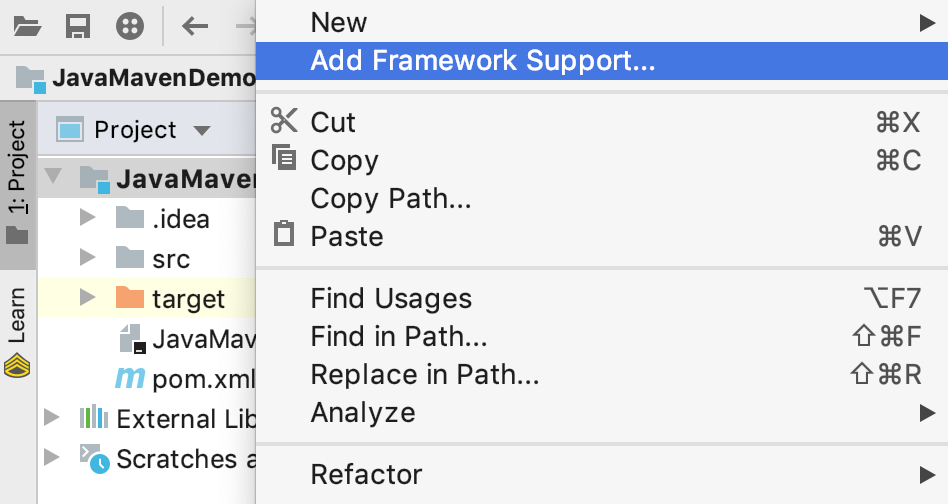
In the dialog that opens, select Maven from the options on the left and click OK

Add run scripts
Create a folder called assets in the root directory of your project.Copy the run scripts into the folder
Change the module names according to your projects module
Edit pom.xml
Extend the properties tag with dynamic maven compiler version based of the projects java version
<!-- JAVA COMPILER VERSIONS -->
<java.version>11</java.version>
<maven.compiler.source>${java.version}</maven.compiler.source>
<maven.compiler.target>${java.version}</maven.compiler.target>
Also in the properties tag, additionally to the base dependencies from Minimal example application add the dependency version for FXGL and the build plugins.
<!-- DEPENDENCIES VERSIONS -->
<slf4j.version>2.0.0-alpha0</slf4j.version>
<pi4j.version>2.0-SNAPSHOT</pi4j.version>
<fxgl.version>11.16</fxgl.version>

<!-- BUILD PLUGIN VERSIONS -->
<exec-maven-plugin.version>1.6.0</exec-maven-plugin.version>
<maven-compiler-plugin.version>3.8.1</maven-compiler-plugin.version>
In the FXGL version 11.16 sepcial javaFX libraries are included to run on raspberryPi
Add following dependency for FXGL:
<dependencies>
    <!-- FXGL library which includes JavaFX -->
        <dependency>
            <groupId>com.github.almasb</groupId>
            <artifactId>fxgl</artifactId>
            <version>${fxgl.version}</version>
        </dependency>
</dependencies>
The following code is used to build the application in order to run it on the raspberryPi.
Insert the module path and the path to the main class at the with [INSERT MODULE PATH] marked location.For example:
<build>
    <plugins>
        <!-- JAVA COMPILER -->
        <plugin>
            <groupId>org.apache.maven.plugins</groupId>
            <artifactId>maven-compiler-plugin</artifactId>
            <version>${maven-compiler-plugin.version}</version>
            <configuration>
                <release>${java.version}</release>
                <showDeprecation>true</showDeprecation>
                <showWarnings>true</showWarnings>
                <verbose>false</verbose>
            </configuration>
        </plugin>

        <!-- DEFAULT JAR EXECUTABLE CLASS -->
        <plugin>
            <groupId>org.codehaus.mojo</groupId>
            <artifactId>exec-maven-plugin</artifactId>
            <version>${exec-maven-plugin.version}</version>
            <executions>
                <execution>
                    <goals>
                        <goal>java</goal>
                    </goals>
                </execution>
            </executions>
            <configuration>
                <executable>java</executable>
                <arguments>
                    <argument>--module-path</argument>
                    <argument>${project.build.directory}/distribution</argument>
                    <argument>--module</argument>
                    <argument>[INSERT MODULE PATH]</argument>
                </arguments>
            </configuration>
        </plugin>

        <!-- BUILD THE FINAL JAR FILE IN THE /target/distribution PATH -->
        <plugin>
            <groupId>org.apache.maven.plugins</groupId>
            <artifactId>maven-jar-plugin</artifactId>
            <version>3.1.2</version>
            <configuration>
                <outputDirectory>${project.build.directory}/distribution</outputDirectory>
            </configuration>
        </plugin>

        <!-- COPY ANY RUNTIME SCRIPTS TO THE /target/distribution PATH  -->
        <plugin>
            <artifactId>maven-antrun-plugin</artifactId>
            <version>1.8</version>
            <executions>
                <execution>
                    <id>copy</id>
                    <phase>package</phase>
                    <configuration>
                        <target>
                            <copy todir="${project.build.directory}/distribution" overwrite="true" flatten="true">
                                <fileset dir="assets" includes="*.sh"></fileset>
                            </copy>
                            <chmod dir="${project.build.directory}/distribution" perm="ugo+rx" includes="**/*.sh"/>
                        </target>
                    </configuration>
                    <goals>
                        <goal>run</goal>
                    </goals>
                </execution>
            </executions>
        </plugin>

        <!-- DOWNLOAD RUNTIME DEPENDENCIES -->
        <plugin>
            <groupId>org.apache.maven.plugins</groupId>
            <artifactId>maven-dependency-plugin</artifactId>
            <executions>
                <execution>
                    <id>copy-dependencies</id>
                    <phase>process-sources</phase>
                    <goals>
                        <goal>copy-dependencies</goal>
                    </goals>
                    <configuration>
                        <outputDirectory>${project.build.directory}/distribution</outputDirectory>
                        <includeScope>runtime</includeScope>
                        <excludeTransitive>false</excludeTransitive>
                        <overWriteReleases>false</overWriteReleases>
                        <overWriteSnapshots>true</overWriteSnapshots>
                        <overWriteIfNewer>true</overWriteIfNewer>
                        <!--
                         On the Raspberry Pi we use specific JavaFX dependencies,
                         so we exclude them here and they are added in the run-script.
                         -->
                        <excludeGroupIds>org.openjfx</excludeGroupIds>
                    </configuration>
                </execution>
            </executions>
        </plugin>
    </plugins>
</build>
Add module-info
In our build we run modules. This module has to be defined in module-info.java.
Add all required dependencies for your project here.
More info for modular FXGL here
open module com.pi4j.example {
// Pi4J MODULES
requires com.pi4j;
requires com.pi4j.plugin.pigpio;

    // SLF4J MODULES
    requires org.slf4j;
    requires org.slf4j.simple;
    requires com.almasb.fxgl.all;

    uses com.pi4j.extension.Extension;
    uses com.pi4j.provider.Provider;

    // allow access to classes in the following namespaces for Pi4J annotation processing
    exports com.pi4j.example to com.almasb.fxgl.core;
}