LED strip with a JavaFX UI
GITHUB PROJECT: github.com/Pi4J/pi4j-jbang > PixelblazeOutputExpanderJavaFX.java
We already know how to control a LED strip, so let’s add a JavaFX User Interface to control the colors on each of the LEDs on the strip.
Full LED strip code walkthrough, and additional info in this live session with Robert (aka Eitch) and Frank:
Intro
This example is based on the Pixelblaze Output Expander (PBOE) JBang example. Make sure to check out the PBOE example, so you fully understand how to set up and use JBang, and connect and control a LED strip via a PBOE.
Application
This example uses the same helper.PixelBlazeOutputExpanderHelper to send commands to the PBOE.
JBang Configuration and Imports
As with each JBang example, we need to define the first script line and the dependencies, and we need to include the helper-source. This example needs some more dependencies and imports for JavaFX.
///usr/bin/env jbang "$0" "$@" ; exit $?

//DEPS com.fazecast:jSerialComm:2.10.2
//DEPS org.openjfx:javafx-controls:20.0.2
//DEPS org.openjfx:javafx-graphics:20.0.2:${os.detected.jfxname}
//SOURCES helper/PixelBlazeOutputExpanderHelper.java

import helper.PixelBlazeOutputExpanderHelper;
import javafx.application.Application;
import javafx.geometry.Pos;
import javafx.scene.control.Button;
import javafx.scene.control.ColorPicker;
import javafx.scene.control.Label;
import javafx.scene.paint.Color;
import javafx.scene.Scene;
import javafx.scene.layout.StackPane;
import javafx.scene.layout.VBox;
import javafx.stage.Stage;

import java.util.ArrayList;
import java.util.List;
JavaFX Code
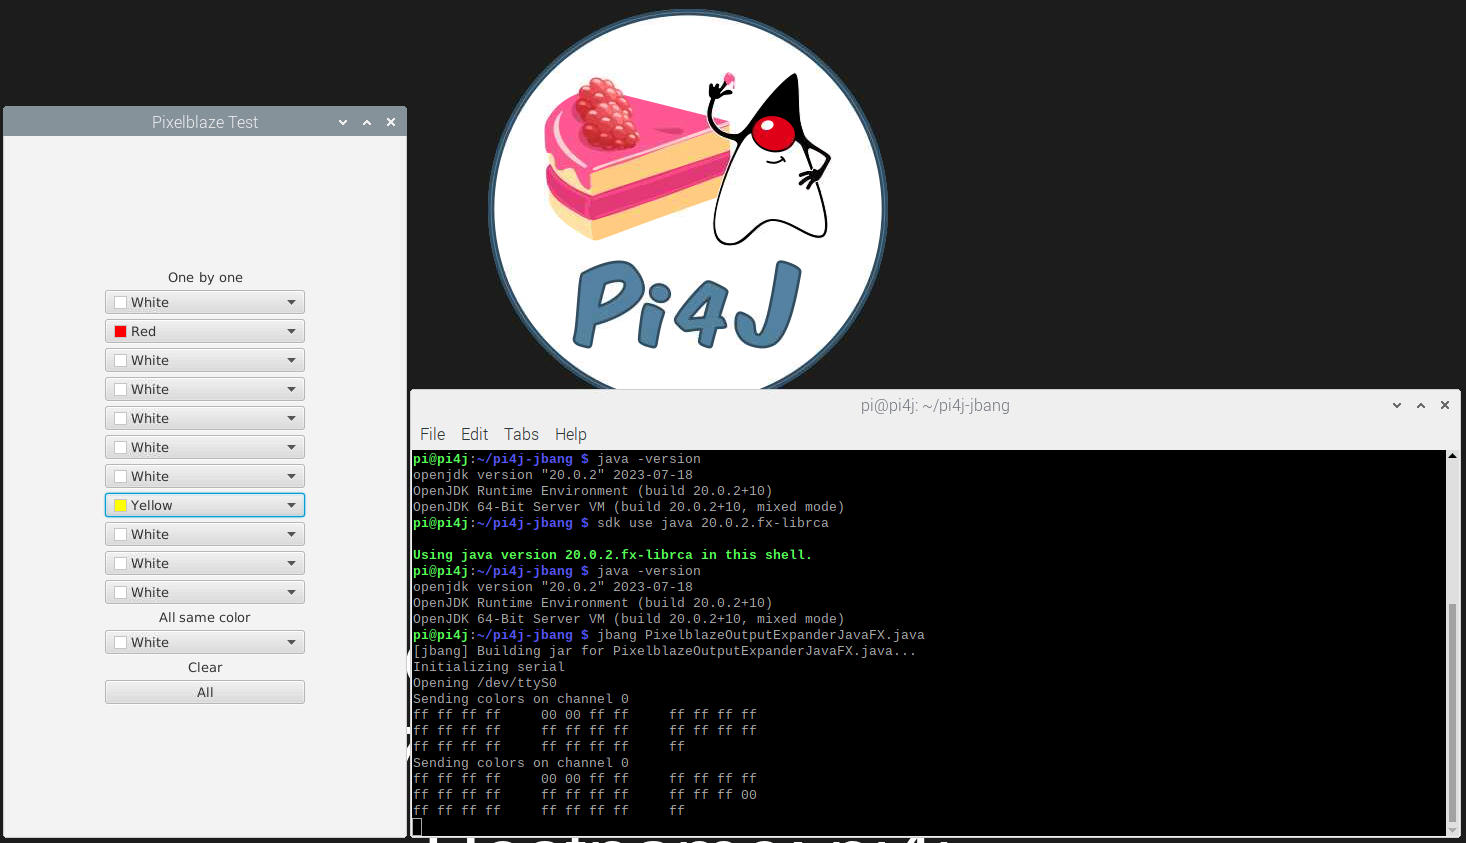
Please check the full example code, as we don’t explain how to use RGB values, but only the JavaFX part. We want a user-interface that shows a color picker to control the LEDs one-by-one, a color picker to put the same color on all LEDs, and a clear button.
private static final int BYTES_PER_PIXEL = 3;
private static final int CHANNEL = 0;
private static final int NUMBER_OF_LEDS = 11;

private List<ColorPicker> colorPickers = new ArrayList<>();
private PixelBlazeOutputExpanderHelper helper;

@Override
public void start(Stage stage) {
    // Depending on the type of board and the connection you are using
    // (GPIO pin, or other serial connection), this can be a different port.
    // Most probably it will be `/dev/ttyS0` (Raspberry Pi 4 or earlier),
    // or `/dev/ttyAMA0` (Raspberry Pi 5).
    helper = new PixelBlazeOutputExpanderHelper("/dev/ttyS0");

    VBox holder = new VBox();
    holder.setFillWidth(true);
    holder.setAlignment(Pos.CENTER);
    holder.setSpacing(5);

    // Color picker to control the LEDs one-by-one
    holder.getChildren().add(new Label("One by one"));
    for (int led = 0; led < NUMBER_OF_LEDS; led++) {
        ColorPicker colorPicker = new ColorPicker();
        colorPicker.setPrefWidth(200);
        colorPicker.setOnAction(e -> sendColors());
        holder.getChildren().add(colorPicker);
        colorPickers.add(colorPicker);
    }

    // Color picker to put the same color on all LEDs
    holder.getChildren().add(new Label("All same color"));
    ColorPicker colorPicker = new ColorPicker();
    colorPicker.setPrefWidth(200);
    colorPicker.setOnAction(e -> sendAll(colorPicker.getValue()));
    holder.getChildren().add(colorPicker);

    // Clear button
    holder.getChildren().add(new Label("Clear"));
    Button clearAll = new Button("All");
    clearAll.setPrefWidth(200);
    clearAll.setOnAction(e -> helper.sendAllOff(CHANNEL, NUMBER_OF_LEDS));
    holder.getChildren().add(clearAll);

    Scene scene = new Scene(new StackPane(holder), 400, 700);
    stage.setTitle("Pixelblaze Test");
    stage.setScene(scene);
    stage.show();
}

private void sendColors() {
    byte[] colors = new byte[NUMBER_OF_LEDS * BYTES_PER_PIXEL];
    for (int led = 0; led < NUMBER_OF_LEDS; led++) {
        Color color = colorPickers.get(led).getValue();
        colors[BYTES_PER_PIXEL * led] = (byte) (255 * color.getRed());
        colors[(BYTES_PER_PIXEL * led) + 1] = (byte) (255 * color.getGreen());
        colors[(BYTES_PER_PIXEL * led) + 2] = (byte) (255 * color.getBlue());
    }
    helper.sendColors(CHANNEL, BYTES_PER_PIXEL, 1, 0, 2, 0, colors, true);
}

private void sendAll(Color color) {
    byte[] colors = new byte[NUMBER_OF_LEDS * 3];
    for (int led = 0; led < NUMBER_OF_LEDS; led++) {
        colors[BYTES_PER_PIXEL * led] = (byte) (255 * color.getRed());
        colors[(BYTES_PER_PIXEL * led) + 1] = (byte) (255 * color.getGreen());
        colors[(BYTES_PER_PIXEL * led) + 2] = (byte) (255 * color.getBlue());
    }
    helper.sendColors(CHANNEL, BYTES_PER_PIXEL, 1, 0, 2, 0, colors, true);
}
Running the Application
To run this example, we need a runtime that has JavaFX included. At this moment, only a few are available. In case you are using a 64bit Raspberry Pi 0S, you can use SDKMAN to install and use such a runtime:
$ curl -s "https://get.sdkman.io" | bash
$ source "$HOME/.sdkman/bin/sdkman-init.sh"
$ sdk install java 22.0.1.fx-zulu

# Or if you already ran the install
$ sdk use java 22.0.1.fx-zulu
Using java version 22.0.1.fx-zulu in this shell.

$ java -version
openjdk version "22.0.1" 2024-04-16
OpenJDK Runtime Environment Zulu22.30+13-CA (build 22.0.1+8)
OpenJDK 64-Bit Server VM Zulu22.30+13-CA (build 22.0.1+8, mixed mode, sharing)
No sudo is needed for serial communication with the jSerialComm library, so the application can be started with:
$ jbang PixelblazeOutputExpanderJavaFX.java
[jbang] Building jar for PixelblazeOutputExpanderJavaFX.java...
Initializing serial
Opening /dev/ttyS0
Sending colors on channel 0
ff ff ff ff 	00 00 ff ff 	ff ff ff ff
ff ff ff ff 	ff ff ff ff 	ff ff ff ff
ff ff ff ff 	ff ff ff ff 	ff
Sending colors on channel 0
ff ff ff ff 	00 00 ff ff 	ff ff ff ff
ff ff ff ff 	ff ff ff ff 	ff ff ff 00
ff ff ff ff 	ff ff ff ff 	ff
Conclusion
JavaFX is an easy way to create a user interface and thanks to the reuse of the existing Pixelblaze Output Expander helper code, this example provides a lot of functionality with minimal code.