Minimal Example
Minimal Pi4J with JBang example
GITHUB PROJECT: github.com/Pi4J/pi4j-jbang > Pi4JMinimalExample.java
Intro
Before proceeding with this example, make sure that you have a Raspberry Pi prepared to execute Java code with JBang as explained here.
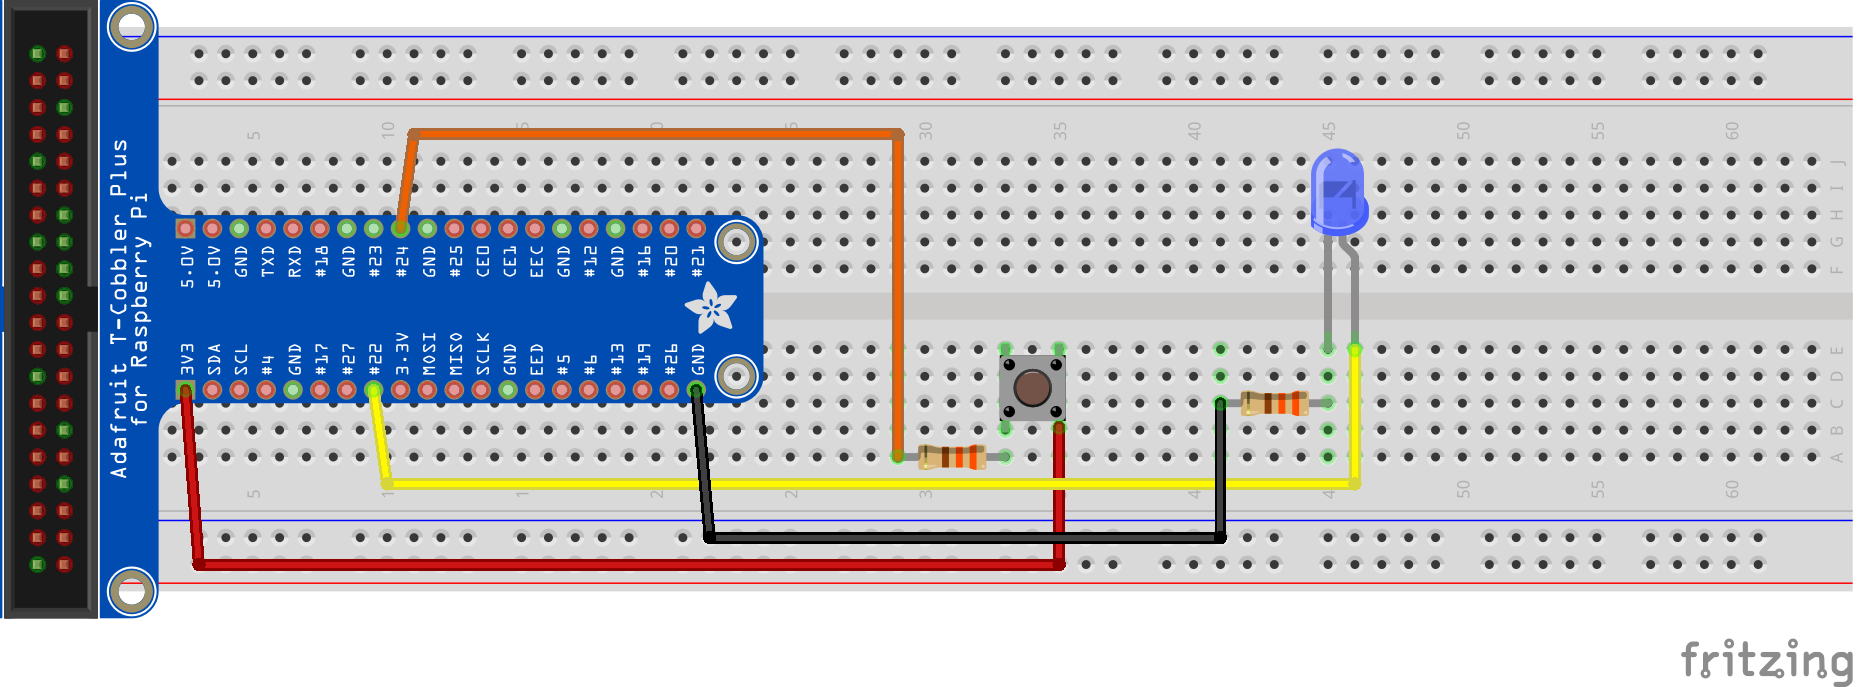
The following example is based on the “Minimal example application”, and uses the same wiring with a button and LED. By using JBang we can run this project with a single file without the need of a full Maven or Gradle project, or compiling the Java code.
Application
Create a new file Pi4JMinimalExample.java with the following content:
///usr/bin/env jbang "$0" "$@" ; exit $?

//DEPS org.slf4j:slf4j-api:1.7.35
//DEPS org.slf4j:slf4j-simple:1.7.35
//DEPS com.pi4j:pi4j-core:2.3.0
//DEPS com.pi4j:pi4j-plugin-raspberrypi:2.3.0
//DEPS com.pi4j:pi4j-plugin-pigpio:2.3.0

import com.pi4j.Pi4J;
import com.pi4j.io.gpio.digital.DigitalInput;
import com.pi4j.io.gpio.digital.DigitalOutput;
import com.pi4j.io.gpio.digital.DigitalState;
import com.pi4j.io.gpio.digital.PullResistance;
import com.pi4j.util.Console;

public class Pi4JMinimalExample {

    // Connect a button to PIN 18 = BCM 24
    private static final int PIN_BUTTON = 24;
    // Connect a LED to PIN 15 = BCM 22
    private static final int PIN_LED = 22;

    private static int pressCount = 0;

    public static void main(String[] args) throws Exception {

        final var console = new Console();

        var pi4j = Pi4J.newAutoContext();

        var ledConfig = DigitalOutput.newConfigBuilder(pi4j)
                .id("led")
                .name("LED Flasher")
                .address(PIN_LED)
                .shutdown(DigitalState.LOW)
                .initial(DigitalState.LOW)
                .provider("pigpio-digital-output");
        var led = pi4j.create(ledConfig);

        var buttonConfig = DigitalInput.newConfigBuilder(pi4j)
                .id("button")
                .name("Press button")
                .address(PIN_BUTTON)
                .pull(PullResistance.PULL_DOWN)
                .debounce(3000L)
                .provider("pigpio-digital-input");
        var button = pi4j.create(buttonConfig);
        button.addListener(e -> {
            if (e.state() == DigitalState.LOW) {
                pressCount++;
                console.println("Button was pressed for the " + pressCount + "th time");
            }
        });

        while (pressCount < 5) {
            if (led.equals(DigitalState.HIGH)) {
                console.println("LED low");
                led.low();
            } else {
                console.println("LED high");
                led.high();
            }
            Thread.sleep(500 / (pressCount + 1));
        }

        pi4j.shutdown();
    }
}
Running the Application
Because this example uses the PiGpio plugin, we need to execute it with sudo:
Without the need of any further configuration, installation, dependency download, or compiling, we should now be able to run this code with:
$  sudo `which jbang` Pi4JMinimalExample.java

Downloading JDK 11. Be patient, this can take several minutes...
[main] INFO com.pi4j.Pi4J - New auto context
[main] INFO com.pi4j.Pi4J - New context builder
[main] INFO com.pi4j.platform.impl.DefaultRuntimePlatforms - adding platform to managed platform map [id=raspberrypi; name=RaspberryPi Platform; priority=5; class=com.pi4j.plugin.raspberrypi.platform.RaspberryPiPlatform]
[main] INFO com.pi4j.util.Console - LED high
[main] INFO com.pi4j.util.Console - LED low
[main] INFO com.pi4j.util.Console - LED low
[Thread-0] INFO com.pi4j.util.Console - Button was pressed for the 1th time
[main] INFO com.pi4j.util.Console - LED high
[main] INFO com.pi4j.util.Console - LED low
[main] INFO com.pi4j.util.Console - LED high
[Thread-2] INFO com.pi4j.util.Console - Button was pressed for the 2th time
[main] INFO com.pi4j.util.Console - LED low
[main] INFO com.pi4j.util.Console - LED high
...
[main] INFO com.pi4j.util.Console - LED high
[main] INFO com.pi4j.util.Console - LED low
[Thread-8] INFO com.pi4j.util.Console - Button was pressed for the 5th time
Conclusion
With JBang we can have a single-source Java file that can be executed without the need for a full Maven or Gradle project. And we don’t even need to compile anything!
JBang is a great way to simply run Java-files, helps you to quickly get started with Pi4J on the Raspberry Pi, and can be the ideal getting-started method to experiment with electronics and Java.